
I plant the seeds about 1/2 inch deep in well-drained soil, watering well initially and later only sparingly. Unlike more familiar legumes, the cotyledons (constituting the bulk of the seed) remain underground, providing nourishment for the new plant. Initial growth seems to focus on creating a deep root, a shallow container thus being unsuitable. The first visible sign of germination is a slender shoot with the beginnings of the first true leaves, at which point the root is likely to have reached a depth of 6-8 inches.

Several weeks after the 'pink' stage noted above the familiar deep red seed covering will harden and the seed will rapidly shrink and rattle inside the pod. At this stage the pods will be very tough, requiring a sharp knife to cut through to remove seeds - but the space between the seed and the pod reduces the danger of cutting into the seeds. At first the seed coat is like soft plastic and only minimal scarification is needed to permit imbibing of water and swelling back to the size of the original green seed. At this stage I use a sharp knife to plane off a thin slice of the outer red seed coat (but not through it). Bit by bit this outer coat will harden, and as it does a greater degree of scarification will be required. Perhaps a test of adequate scarification would be whether soaking for several hours leads to noticeable swelling. (But do not soak for long periods - as in the above image. That was done only to show that the seed will eventually swell to the size of the seed before dormancy.)
My neighbor, Marion, told me that he was able to get the 'hardened' red seeds to swell by simply wrapping in a wet paper towel. The key word here is 'hardened' - which, as commonly used, covers a wide range of actual outer coat hardness. To test this method, on July 14 I collected 10 seeds of the season (1999) and 10 seeds still on the bush from the previous year. In hardness to the touch these two sets were indistinguishable. I wrapped each set in a wet paper towel, placed this on a plastic tray, and covered to keep out light and reduce evaporation - outside in a shady area. Seven days later I inspected the seeds and found that the towel with the 1999 seeds was fairly dry and had pink coloring from the seeds. Although my intial reaction was that the 1999 set somehow had just dried out, in fact the moisture had been imbibed by the seeds. I wetted that towel again. 10 days from the start of the test all but 2 of the 1999 seeds had germinated, and these two as well appeared ready to germinate; and the towel had become quite red. [Those seeds that had germinated were successfully moved to containers at that point.] On August 15 I repeated the wet-towel approach with 10 more seeds of the current season. This time none of the seeds imbibed water. It would appear that (at least in 1999) the critical degree of hardness was reached between mid July and mid August. One indicator would be whether any leaching of the red/pink coloring occurs after one week. Obviusly, none of the 1998 seeds ever responded to this approach.
Eventually the seed shell will become so hard, especially with seeds from an earlier year, that more effort and skill will be required for adequate scarification without damaging the embryo. Perhaps the simplest process is to hold the seed with a pliers and with a file rub one spot on the outer coat (at the larger cotyledon end) until the thin light-colored (tan) inner coat is visible - being careful not to scratch into the inner coat itself nor into the cotyledons of the embryo.
For more details of the seed structure and the germination process.
Soak the scarified seeds several hours and then plant them only if swelling has occurred. Otherwise repeat the scarification and soaking.
Starting mountain laurel in containers will probably give better control of moisture and pests. Move to the ground (or a larger container) as desired.
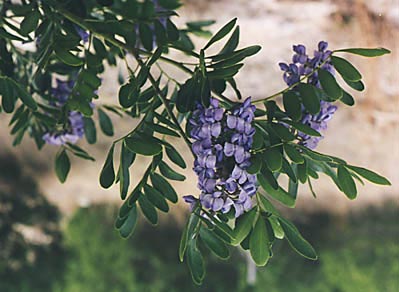
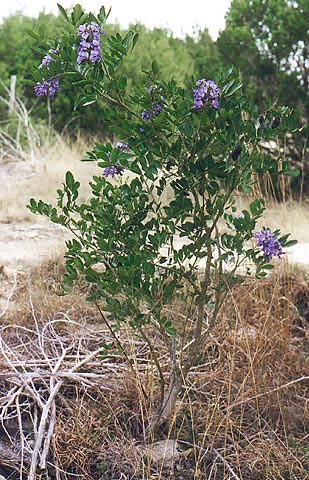
Mountain laurel is a slow grower, and it may be years before flowers are produced. In our hill-country environment it has taken at least 10 years for untended plants started from seed to bloom.
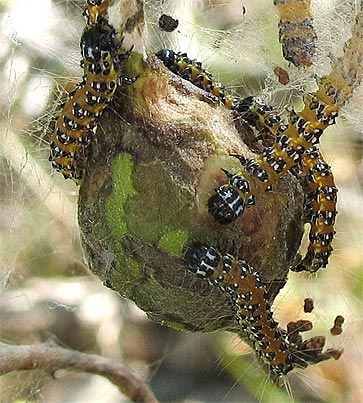
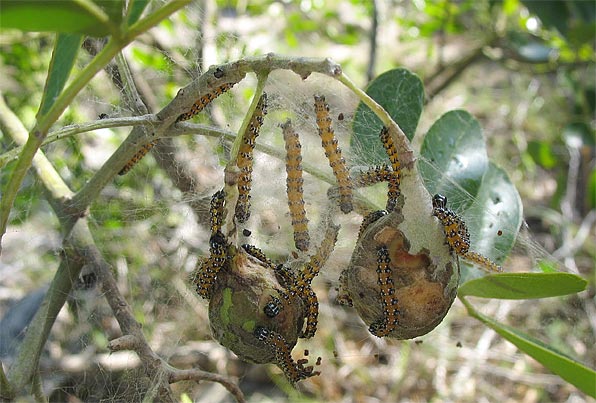
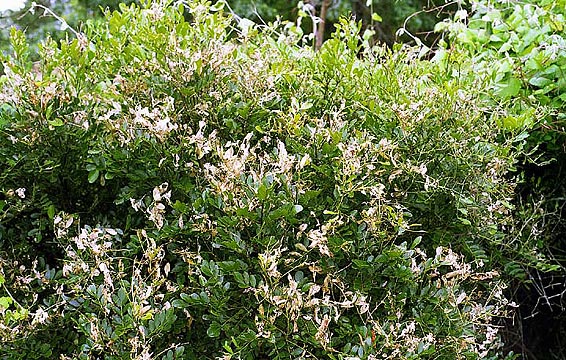
Our experience has been that plants in higher (and drier) ridges have grown more slowly but have bloomed much earlier. The faster growing plants in better soil in the valley are attacked almost every spring by Sophora worms (Uresiphita reversalis. With only a few small plants one can usually just remove these by hand. Bacillus thuringiensis ('Bt'; available from nurseries) is said to be effective if the larvae are caught at an early stage. In the spring of 1999, with many larger plants, I just gave up, hoping that once the succulent new growth had been devoured, the larvae would leave the hardened older leaves alone, as has generally been their custom. Not so! Several plants were stripped so that not a single leaf remained. In late June new leaves began to form, but the worms reappeared the first week of July. To my knowledge no plant has died because of this damage. (I hasten to note that once established as seedlings the plants attacked had never been watered or fertilized, since it has been suggested that these attacks result from attempts to push growth.)
|
|
|
|
On a brighter note, the deer have never touched any of our Mountain Laurels, no matter how fresh and succulent. (Actually two seedlings were yanked from pots as deer ate adjacent plants.)
A second clear difference between our valley and ridge, some 90' higher, is the overnight low temperatures. Once the flower buds have formed, generally in early spring - in 1999 already at the end of February - a frost in the mid twenties is fatal. Most years the pooling of cold air in the valley has terminated both buds and flowers. Protecting the developing bud/flower spikes with the threat of a significant frost is strongly recommended. Worthy of note is that the only naturally occurring Mountain Laurel in our area is on a hilltop at 1124' above sea level, with valleys below 1000'.
 | 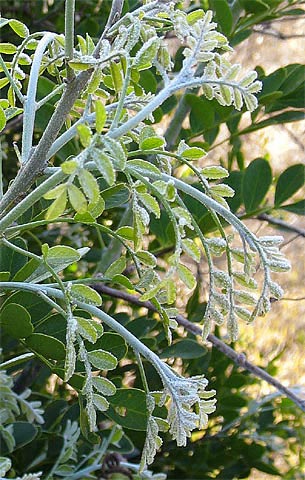 |
| On the ridge. | Ice-covered leafs in the valley, March 24, 2006 |
|---|
One of my best bloomers is on a rocky ridge exposed to the northwest wind, with no shade. The plant is very hardy, but blooming in the hill country may require extra care.